You’ve probably seen those “passive income” videos on YouTube promising thousands of dollars a month from Amazon KDP. While the reality is a bit more work-intensive than those creators suggest, there is a genuine opportunity sitting right in front of you. The barrier to entry for making high-quality coloring books used to be high—you needed serious drawing skills or a budget for illustrators. Now, AI tools have changed the math. You can go from a blank screen to a finished, publishable manuscript much faster than before, provided you know how to direct the technology.

Creating a coloring book isn’t just about generating random images and dumping them into a PDF. It requires a strategy for themes, a consistent art style, and a deep understanding of what customers actually want to buy. This guide will walk you through the practical steps of using AI to build a coloring book business from scratch.
Finding a Profitable Niche
Before you ever touch an AI generator, you need to know what you are making. If you try to create a “generic coloring book for kids,” you will get buried under millions of existing titles. Success on KDP comes from finding specific, underserved niches.
- Adult Mandalas: Highly competitive, but high demand.
- Educational Coloring: Books that teach the alphabet, dinosaurs, or anatomy.
- Themed Stress Relief: “Cottagecore” aesthetics, “Dark Academia,” or “Spooky Cute” patterns.
- Niche Hobbies: Gardening, vintage motorcycles, or specific dog breeds.
Use the Amazon search bar to see what people are looking for. Type in a keyword and see what the auto-complete suggests. Those suggestions are real searches. If you see a specific sub-niche with low competition but decent-looking books, you’ve found your starting point.
Generating High-Quality Line Art with AI
Midjourney is currently the gold standard for this type of work, though DALL-E 3 is a strong runner-up for ease of use. The secret to getting usable coloring pages lies entirely in your prompting strategy. You aren’t just asking for a “dog”; you are asking for a specific type of technical illustration.
Mastering the Prompt for Line Art
To get images that are actually colorable, you need to tell the AI to avoid shading, gradients, and complex textures. If the AI adds too much gray, the image becomes a mess of “muddy” tones that are impossible to color with markers or pencils.
Try including these specific terms in your prompts:
- “Black and white line art”
- “Clean white background”
- “Thick outlines”
- “Vector style”
- “Low detail” (if making books for toddlers)
- “Intricate detail” (if making books for adults)
- “No shading, no gradients”
An example of a working prompt might look like: “Simple coloring page for kids, a cute baby dragon sitting on a cloud, thick black outlines, white background, high contrast, black and white line art, no shading –ar 2:3”.
Maintaining Style Consistency
One mistake beginners make is having page one look like a cartoon and page two look like a realistic pencil sketch. This ruins the professional feel of your book. In Midjourney, you can use the Style Reference (–sref) feature. Once you generate one image you love, you can use its URL as a reference for all subsequent prompts to ensure the lines and weight remain identical throughout the book.
Refining and Cleaning Your Images
AI-generated images are rarely “print-ready” straight out of the generator. They often have artifacts, blurry edges, or slight gray tones. You need to process them to ensure they look crisp on paper.
First, you should upscale your images. AI generators usually output images at a relatively low resolution. Use a tool like Gigapixel AI or free online upscalers to bring your images up to at least 300 DPI. This prevents your printed book from looking blurry or pixelated.
Second, you need to “vectorize” or clean the lines. Using software like Adobe Illustrator or free alternatives like Inkscape, you can trace your images to turn them into vectors. This makes the lines infinitely scalable and much sharper. If you aren’t tech-savvy, even a simple way to increase contrast in Canva can help remove unwanted gray shadows.
Assembling the Book in Canva or InDesign
Now that you have your cleaned-up images, it is time to build the actual manuscript. Canva is the most user-friendly option for most KDP creators. You simply create a document with the standard KDP size (usually 8.5 x 11 inches) and drop your images onto the pages.
Keep these layout tips in mind:
- Single-sided printing: Always leave the back of each coloring page blank. This prevents “bleed-through” if the user uses markers, and it makes your book feel more premium.
- Margin Safety: Ensure your art isn’t too close to the “gutter” (the middle spine). If it is, people won’t be able to color the inner part of the page easily.
- Page Numbering: While not strictly necessary for coloring books, a clean layout helps with organization.
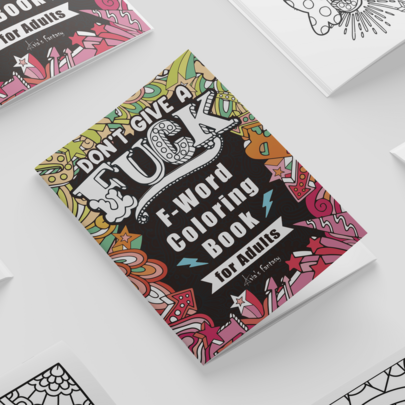
Creating a High-Converting Cover
Your cover is your most important marketing tool. It is the only reason someone will click on your listing. While the inside of your book is black and white, the cover should be vibrant, colorful, and professional. It needs to show exactly what is inside the book.
A great strategy is to take one of your best AI-generated images, color it digitally (or use a tool to apply a color filter), and use that as the centerpiece. Make sure your title is large, legible, and uses a font that matches the theme of the book. If it’s a spooky book, use a creepy font; if it’s for toddlers, use something bubbly and fun.
Final Checklist Before Uploading to KDP
Before you hit publish, run through this final quality check to avoid getting rejected by Amazon or receiving bad reviews:
- Check for “ghost” lines or stray pixels in the white spaces.
- Verify that all images are at 300 DPI.
- Ensure your spine width is calculated correctly based on your page count.
- Check that your cover text is not cut off by the bleed lines.
Building a KDP business is a marathon, not a sprint. Don’t expect to upload one book and retire. The real success comes from building a library of high-quality, niche-specific books that consistently show up in search results.
Ready to start your publishing journey? Pick one niche today, generate five sample images, and see how the process feels. The tools are ready—all you have to do is start prompting.
Our Top Picks
Products we recommend:
1. How to Use Books

2. How to Use Books

3. How to Use Books